Simple Guitar Strumming and Fingerpicking Patterns
Who doesn’t know it? You’re playing your 200,000th song, but it sounds exactly like the other 199,999 songs before it. Of course, with very high probability, you’re playing the same chords in 99% of the songs. But that’s not the problem. The main issue lies in the accompaniment rhythms.
Let’s get right to one of the biggest mysteries for guitar beginners and take a look at the first line of ‘Happy Birthday’ (if someone is celebrating their birthday right now: Congratulations! This song is for you :P).
Here we have two pieces of information (actually more, but for now, we’re only interested in these two).
- We see the melody (those black dots on the lines)
- And we see the chords (D and A)

About the Melody
The melody in this song would primarily be sung by singers. However, there are other possibilities, such as various wind instruments (flutes, saxophones, clarinets), as well as playing these ‘notes’ on the piano and guitar.
I’ll assume for now that this melody is played by a (programmed) guitar. It would sound something like this:
Nothing wrong with that. It actually sounds very much like Happy Birthday. That’s because these black dots provide information such as ‘pitch’ and ‘duration.’ If the note is played exactly at the right pitch, with the correct lenght at the right time, the melody sounds just as we know it. Just as a tiny example on the side: I keep the pitch exactly as it should be, but I use a completely different rhythm. Can you still recognize the song?
Those were the exact same notes, just played in different lengths. Probably, nobody would have figured it out if you didn’t know that the same notes were coming again, right? =)
Anyway, just to repeat: In the melody, everything is there that you need to make a melody or a song sound exactly as you know it.
About the Chords
In contrast to the melody, the chords provide no rhythm at all. The only thing you know about the song shown above is that it has a D major and an A major chord.
Of course, for those who already know, there’s also the information that we have a 3/4 time signature. This further peg down the rhythm choices.
Since guitarists supposedly can’t read sheet music anyway (of course, just stereotypes! :P) and there are no rhythm indications for the chords, we, as rhythm/accompanying instruments, are essentially facing an almost blank sheet music.
However, this can be easily circumvented.
Option 1:
Play the chord once per bar. Count the rest of the bar. What you need for this is the time signature (is it 4/4, 3/4, or 6/8?). In a 4/4, play on the first beat. So, 1 (play), 2 (count), 3 (count), 4 (count). In a 3/4 (like in our Happy Birthday example), simply adjust to the time signature: 1 (play), 2 (count), 3 (count), 1 (play), 2 (count), 3 (count), etc.
By counting, I mean audibly counting. Not just thinking about it or saying a number randomly. It does make sense to audibly count. But don’t worry, you don’t have to do it that way all the time. =)
Now you have a boring but solid accompaniment. You won’t mess up the timing, won’t lose count, and won’t find yourself at the end of a song while the rest of the band is still in the middle (hopefully! :P).
Option 2:
You play as in Option 1, hitting the chord on each beat, but this time on all three beats. So, you play a chord on every beat. It’s not the most elegant solution to accompany a song, but still better than our no-go option!
The No-go Option!
Under no circumstances should you play the rhythm of the melody in your accompaniment. I’ve encountered situations where students thought they had to play the exact rhythm with the chords as the lovely singer sings. Remember: that’s not the case. Play a rhythm that is completely independent of the melody.
Don’t get me wrong! Of course, there are songs where the guitar plays the exact same rhythm as what is sung. However, this often applies to just a few notes, or it is more complex music than what we are currently looking at here.
Strumming Patterns on the Guitar
Try playing 2–3 different rhythms over random chords. Take, for example, Am, C, G, D. Now, try changing the chord every bar. However, the rhythm pattern always stays the same.
Once you’re done and have found your 2–3 favorites, play these rhythms over different songs.
Fingerpicking Patterns on the Guitar
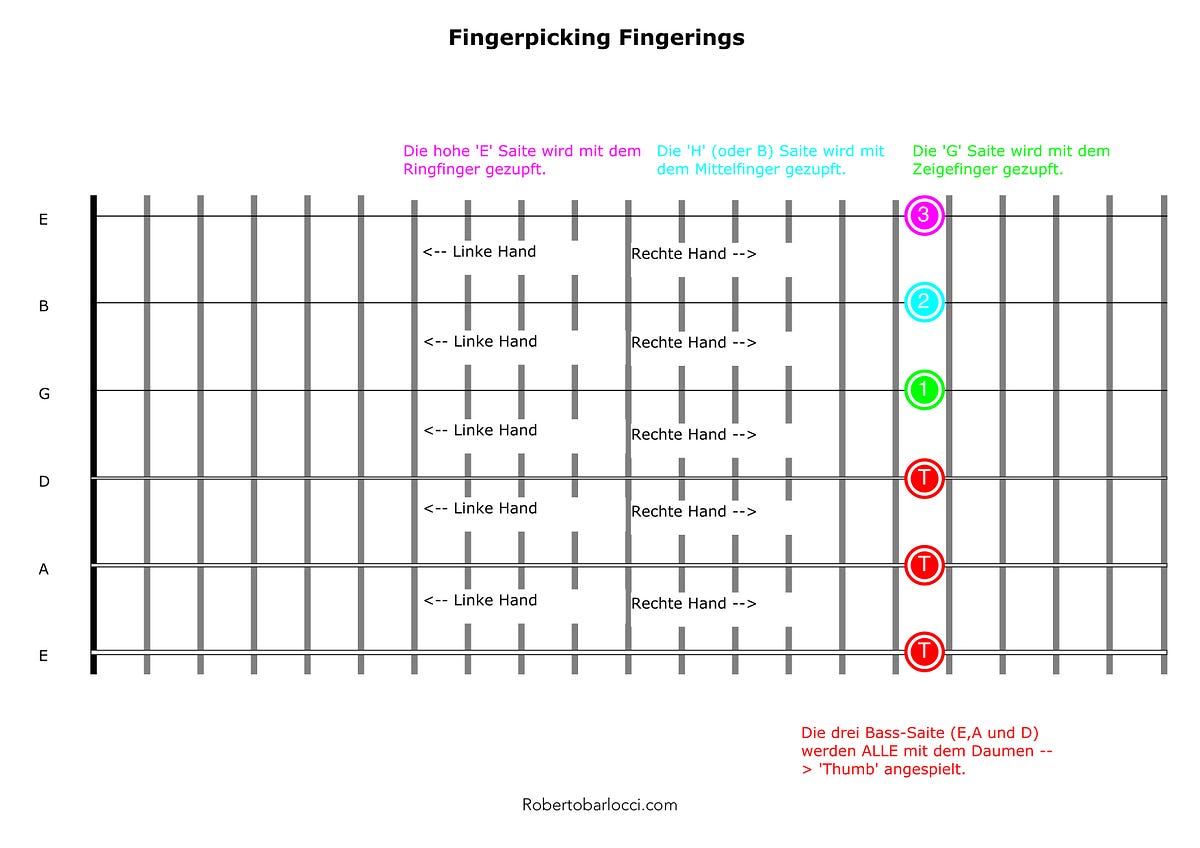
Here, it is crucial to pay attention to the right hand!
The bass strings (E, A, and D) are always played with the thumb (right hand). The index finger plays the G string, the middle finger plays the B string, and the ring finger plays the high e string. The reason for this is that you are learning not to look at the right hand and always know where your fingers are.
Do the same with fingerpicking patterns. Start with any chords that you feel comfortable with. Then switch to songs and try playing these fingerpicking patterns over them.
How do I read the patterns?
We have ‘rows’ and ‘columns’ (rows go from left to right, and columns go from top to bottom). A ‘row’ always has the same pattern; it is only adjusted to the chord from column to column. However, the sound remains the same.

In this example, we see three bars because we have 3 bass strings on the guitar. The first bars is intended for chords that have the E string as the bass (not the note E but just the E string). For chords with the E string as the bass, please see below.
The second bars is the exact same pattern as the first measure, but here, the bass is adjusted. So, in this case, you don’t play the E string at all; instead, the bass is shifted to the A string, as this measure is for chords with the A string as the bass.
The same applies to the last bars, just referring to the D string.